Kitchen Renovation Electrical
Planning: Circuits, Outlets, and Code
Chris Nickel
Red Seal Journeyman Electrician — CN Electrical, Chilliwack, BC
A modern kitchen needs at least 6 dedicated circuits: two 20-amp small-appliance circuits (split top/bottom at each outlet), dedicated circuits for the fridge, microwave, dishwasher, and range/oven, plus lighting on its own circuit. Every countertop outlet must be GFCI-protected and AFCI-protected, spaced no more than 900mm apart along the counter with no point on a countertop more than 450mm from an outlet. Islands and peninsulas now require at least one outlet. The single biggest mistake we see in kitchen renos: the homeowner opens the walls on a Monday and calls us on a Tuesday when they realize their existing wiring isn't anywhere close to code. Plan the electrical before demolition — it's cheaper, faster, and safer. Need a kitchen lighting plan too? We handle that. For existing wiring repair and troubleshooting, call us anytime.
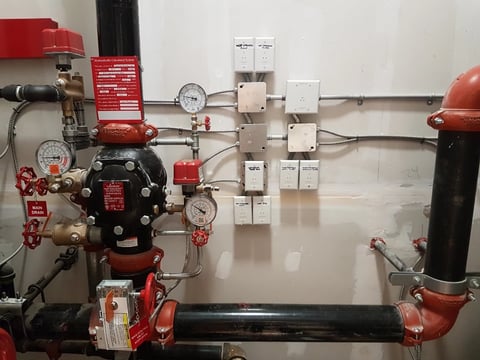
The kitchen is the most electrically demanding room in any home. A single kitchen countertop can simultaneously power a coffee maker (900 watts), a toaster (1200 watts), and an air fryer (1500 watts) — over 3600 watts on one counter. Add a microwave, dishwasher, range hood, and refrigerator, and the total electrical load in a modest kitchen during meal prep can exceed 10,000 watts. That's more than most 60-amp fuse boxes were rated for in their entirety. If your panel can't handle the load, read our guide: When to Upgrade Your Electrical Panel: 7 Signs You Shouldn't Ignore.
The Canadian Electrical Code has specific, detailed requirements for kitchen electrical — and for good reason. The CEC's kitchen rules are among the most frequently updated sections because kitchens are where the combination of water, heat-producing appliances, and dense outlet usage creates the highest electrical risk environment in the home. If you're also upgrading bathrooms, see our kitchen and bathroom electrical upgrade services.
If you're planning a kitchen renovation in Chilliwack — whether it's a cosmetic refresh or a full gut-and-rebuild — the electrical planning should start before any walls are opened. Here is exactly what you need to know, organized by what the code requires, what it costs, and what order the work should happen in. For broader renovation electrical, see our home renovation electrical services.
What You'll Learn in This Guide
Click the quick-links below to jump to any section.
- 1.Dedicated Kitchen Circuits — What the CEC Requires
- 2.Outlets and Island/Peninsula Requirements
- 3.AFCI and GFCI Protection in the Kitchen
- 4.Major Appliance Circuits — Range, Microwave, Dishwasher
- 5.Kitchen Lighting — Task, Ambient, and Accent Circuits
- 6.Do You Need a Service or Panel Upgrade?
Plus: typical kitchen electrical costs, the step-by-step renovation timeline, and whether your existing panel can handle the upgrade.
Dedicated Kitchen Circuits — What the CEC Requires
The Canadian Electrical Code is very specific about kitchen circuits. These aren't suggestions or best practices — they are minimum requirements that a TSBC inspector will verify before signing off on your renovation.
- Two 20-amp small-appliance circuits: The CEC requires a minimum of two dedicated 20-amp circuits serving only kitchen countertop receptacles — no lights, no appliances, no dining room outlets on these circuits. The standard wiring approach is a split receptacle: the top and bottom of each duplex outlet are on opposite phases, effectively giving you independent 15A (or 20A combined) at every countertop location. This is why kitchen counter outlets run on 14/3 NMD90 (three-conductor plus ground) rather than 14/2.
- Dedicated circuits required by name: (a) Refrigerator — 15A dedicated circuit (can be 15A, but many electricians run 20A for future flexibility and because newer smart fridges with large displays and ice makers pull more current). (b) Microwave — dedicated 15A or 20A circuit, depending on the microwave's nameplate rating (a built-in microwave is commonly 1200–1500W, which is 10–12.5A, so a dedicated 15A circuit is sufficient but tight — 20A provides headroom). (c) Dishwasher — dedicated 15A circuit. Dishwashers typically draw 1200W (10A), and while they can technically share a circuit with the garbage disposal in some jurisdictions, BC inspectors generally prefer a dedicated circuit. (d) Range/oven — sized to the appliance's nameplate. A standard electric range requires a 40A or 50A 240V circuit with 8/3 or 6/3 NMD90 cable.
- The garbage disposal: While the CEC allows the disposal to share the dishwasher circuit in some configurations, many BC inspectors now require a dedicated disposal circuit. We run a separate 15A circuit to the disposal location as a best practice — it costs about $200 more at rough-in and avoids a potential inspection deficiency.
Code Violation Warning
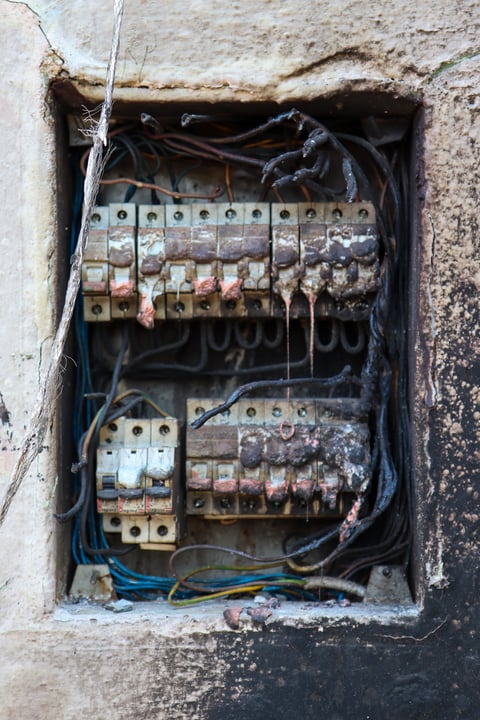
Running too many appliances on a shared circuit doesn't just trip breakers — it can overheat wiring. A microwave and toaster on the same 15A circuit is 25+ amps through wiring rated for 15. The breaker should trip, but breakers do fail — and that's how electrical fires start.

6+
Min. Dedicated Circuits
Outlets and Island/Peninsula Requirements
Outlet placement is one of the most frequently failed inspection items in kitchen renovations. The CEC is exacting about countertop outlet locations, and the requirements for islands and peninsulas have changed significantly in recent code cycles.
- Countertop outlets must be spaced so that no point along the wall countertop is more than 900mm (36 inches) from an outlet, measured horizontally along the wall line. In practice, this means outlets roughly every 1.2 to 1.8 metres depending on counter configuration. Any countertop surface 300mm (12 inches) or wider requires at least one outlet — even short sections beside a fridge or range.
- Islands and peninsulas: As of the 2018 CEC (adopted in BC in 2021), at least one receptacle is required in a kitchen island or peninsula where the countertop surface area exceeds a certain threshold. The outlet can be mounted on the side of the island cabinet (within 300mm of the countertop surface) or installed as a pop-up outlet in the countertop surface. Pop-up outlets are increasingly popular because they preserve a clean stone backsplash-free island look, but they're more expensive ($200–$400 per unit) and require more careful waterproofing.
- The 'island outlet problem' — how to get power to the island: If your kitchen is on a concrete slab (common in Chilliwack ranchers and bi-levels), running a circuit to the island means either cutting the slab (expensive, messy, and risks damaging in-slab heating) or running conduit down from the ceiling through a bulkhead or decorative column. In homes with a crawlspace or unfinished basement, feeding up through the floor is straightforward. This is something to discuss with your electrician before the design is finalized — it can affect your island placement and budget.
Code Violation Warning
Missing island/peninsula outlets is the #1 kitchen electrical inspection fail in BC. The requirement took effect relatively recently and many contractors and homeowners aren't aware of it.
AFCI and GFCI Protection in the Kitchen
The kitchen is one of the few rooms in a home where both AFCI (arc-fault circuit interrupter) and GFCI (ground-fault circuit interrupter) protection are required on the same circuits — for different but equally important safety reasons.
- GFCI protection is required for all kitchen countertop receptacles. A GFCI detects current leakage as small as 5 milliamps and trips within 30 milliseconds — fast enough to prevent a fatal shock. This is essential in kitchens because water and electricity are in close proximity: wet hands reaching for a plugged-in appliance, a coffee maker near the sink, steam from a boiling pot near an outlet. GFCIs protect people.
- AFCI protection is required for all 15A and 20A 120V branch circuits supplying outlets installed in dwelling unit kitchens (CEC Rule 26-658). An AFCI detects the unique electrical signature of arcing — a high-temperature discharge that occurs when electricity jumps through air between conductors, as happens with a loose connection, damaged wire, or pierced cable. AFCIs protect against electrical fires, and they are required because kitchen circuits are among the most heavily loaded and frequently used in a home.
- How to provide both: The most common approach in BC is a dual-function AFCI/GFCI breaker in the panel. This protects the entire circuit — wiring and all — with both protections at the panel. The alternative is a GFCI outlet at the first receptacle in the circuit (providing downstream GFCI protection) combined with an AFCI breaker in the panel. The dual-function breaker is simpler and generally preferred — one device, one trip-point to find, no confusion about which protection tripped.
Code Violation Warning
Do not install a GFCI outlet behind a refrigerator, dishwasher, or microwave — if it trips, resetting it means pulling out the appliance. For these dedicated appliance circuits, use AFCI-only breakers (GFCI is not required for non-countertop kitchen receptacles).
Major Appliance Circuits — Range, Microwave, Dishwasher
Every major kitchen appliance needs its own dedicated circuit. Here is exactly what each appliance requires, with the wire gauge, breaker size, and receptacle type.
- Electric range: This is the single largest circuit in most homes. A standard freestanding electric range with oven requires a 40A or 50A double-pole 240V breaker with 8/3 or 6/3 NMD90 cable — the exact size depends on the range's nameplate rating (check the manufacturer's spec sheet — the range's kW rating divided by 240V gives you the amperage, and the breaker is sized to 125% of the continuous load). The receptacle is a NEMA 14-50R (four-prong, 50-amp). If you're upgrading from gas to electric, you may need a new home run from the panel to the kitchen — this can be a major cost driver if the panel is on the opposite side of the house.
- Built-in microwave: Most built-in microwaves draw 1200–1500W (10–12.5A at 120V). A dedicated 15A circuit with 14/2 NMD90 is the minimum, but we run 20A with 12/2 NMD90 for future flexibility — the added material cost is minimal at rough-in and you'll never have to worry about a future microwave upgrade tripping the breaker. The microwave is typically mounted in a cabinet or above the range; the receptacle goes inside the cabinet above or beside the microwave housing.
- Dishwasher: Dedicated 15A circuit with 14/2 NMD90. The dishwasher should be on a single receptacle or hardwired — not sharing with countertop outlets. We hardwire dishwashers directly rather than using a plug-and-receptacle, which eliminates one potential failure point (a receptacle under a sink cabinet where it could get wet). The disconnect (the means of turning off power to the dishwasher) is the breaker lockout at the panel.
Code Violation Warning
A range circuit is not the place to save money. Undersized wiring for a range circuit that's loaded near its rating will overheat over time. When in doubt, go one wire size up — the incremental material cost is negligible compared to the safety margin.

40–50A
Range Breaker Size
Kitchen Lighting — Task, Ambient, and Accent Circuits
Kitchen lighting is often an afterthought — a single ceiling fixture on a switch loop — but a modern kitchen deserves a proper lighting plan with multiple circuits and dimmer zones.
- Separate the lighting from the small-appliance circuits: Kitchen lighting should always be on its own dedicated circuit(s), separate from the countertop outlets. This prevents two problems: (1) if a countertop appliance trips a breaker, you're not left in the dark; and (2) the lighting circuit isn't loaded up with appliance current, which can cause flicker when a high-draw appliance starts.
- Three-layer lighting design: (a) Ambient — the general room illumination, typically recessed LED pot lights (4-inch slim-line LEDs are the current standard). Spaced roughly 3–4 feet apart on a dimmer. (b) Task — under-cabinet LED strip lighting illuminating the countertop work surface. This is the most functional lighting in the kitchen and should be on its own switch, independent of the ambient lights. (c) Accent — pendant lights over the island, in-cabinet lighting for glass-front cabinets, or toe-kick lighting for nighttime navigation. Each layer on its own dimmer switch.
- Dimming: All kitchen lighting should be dimmable — and it needs to be on dimmer switches rated for LED loads. Older dimmers designed for incandescent bulbs cause LED flicker. Modern LED-compatible dimmers (Lutron Maestro or similar) provide smooth dimming from 100% down to 1% without flicker. We install deep junction boxes (2.25-inch) for dimmer switches because LED dimmers are physically larger than standard switches and a shallow box makes for a messy trim-out.
3
Recommended Layers
Do You Need a Service or Panel Upgrade?
The question we get most often from homeowners planning a kitchen renovation: 'Can my existing panel handle the new kitchen, or do I need an upgrade?' The answer depends on three things — your current service size, your panel's available capacity (physical breaker slots and electrical load), and what appliances you're adding.
- If you have a 100-amp service: adding a full modern kitchen (two 20A counter circuits, dedicated microwave, dishwasher, disposal, range, and lighting) to an existing 100A service with existing loads — electric dryer, furnace, air conditioner, plus general lighting and receptacles throughout the home — will almost certainly exceed the allowable demand load. A 100A service was standard in the 1970s and 80s and was sized for the electrical loads of those decades. We recommend upgrading to 200A as part of the kitchen renovation.
- If you have a 200-amp service but a full panel: a sub-panel can sometimes be a cost-effective solution. We install a 60A or 100A sub-panel fed from the main panel, providing breaker slots for the new kitchen circuits without replacing the main panel. This works when the electrical capacity is adequate but physical space is the constraint. A sub-panel install is typically $800–$1,500 versus $2,500–$5,000 for a full service upgrade.
- Panel brand matters too: If your existing panel is a Federal Pacific Electric Stab-Lok, Zinsco, or any other recalled brand, it should be replaced regardless of capacity. These panels have documented failure-to-trip issues and are not safe to add new circuits to — you'd be connecting brand-new kitchen wiring to breakers that may not trip during a fault.
Code Violation Warning
Don't let your general contractor or kitchen designer tell you the electrical is 'probably fine.' Only a licensed electrician — after performing a load calculation per CEC Section 8 — can determine whether your existing service has capacity for the new kitchen.
Kitchen Electrical Renovation Costs — Chilliwack, BC
Costs depend significantly on whether walls are open (new build or gut renovation) or closed (electrical retrofit with drywall patching required).
Kitchen rough-in electrical (new build or gut reno, 200–300 sq ft)
$3,500 – $7,000
Add outlets to existing kitchen (per outlet, drywall intact)
$200 – $400
Dedicated range circuit (6/3 NMD90, 50A breaker)
$500 – $1,200
Dedicated microwave circuit (14/2 NMD90, 15A, interior wall)
$250 – $500
Island outlet (through-floor feed or pendant drop)
$350 – $800
Kitchen lighting plan — 6–10 pot lights + under-cabinet + pendants
$1,500 – $3,500
Panel or Service Upgrade (if required)
$2,500 – $5,000
If your existing panel doesn't have space or capacity for the new kitchen circuits, a panel upgrade or service upgrade is required. We bundle this with the kitchen rough-in so the work is coordinated.
The Kitchen Electrical Renovation Timeline
Planning & Load Calculation
Before any walls are opened, we review your kitchen plans with you and your contractor. We calculate the total electrical load of the new kitchen — including all appliances, lighting, and countertop circuits — and verify your existing service and panel can handle it. If a panel or service upgrade is needed, this is when we schedule it. This is also when we provide a firm, fixed-price quote.
Rough-In — Walls Open
This is the critical window. With walls and ceiling open, we run new home-run cables from the panel to every kitchen outlet, switch, and appliance location. We install outlet boxes at the code-required spacing and heights, run dedicated circuits to appliance locations, and install junction boxes for island and peninsula outlets. We also run low-voltage cabling — cat6 for a smart fridge, speaker wire for in-ceiling audio, and conduit for future upgrades.
Drywall & Finishing
Drywallers board and finish the walls and ceiling. We coordinate with them to mark every outlet and switch location so nothing gets buried. After the drywall is finished, we return for trim-out — installing outlets, switches, light fixtures, and cover plates.
Final Inspection & TSBC Certificate
A Technical Safety BC inspector verifies the rough-in (with walls open, before drywall) and again at final. We walk the kitchen with you to confirm every outlet, switch, and fixture is exactly where you want it. You receive a Certificate of Compliance for the electrical work — essential for your renovation records and future resale disclosure.
Don't DIY Kitchen Electrical
Kitchen electrical is the most code-intensive work in a home — it's not a place to learn as you go. A non-compliant kitchen electrical installation can mean: a failed TSBC inspection that holds up your entire renovation, a home insurance claim denied because the work wasn't permitted, and the real safety risk — a hidden wiring error that creates a shock or fire hazard behind finished walls.
In BC, a homeowner can pull a homeowner electrical permit for their own primary residence — but the work must still pass TSBC inspection to the same standard as a licensed contractor's work. Most homeowners underestimate the number of circuits required, use undersized wiring, or make grounding errors that an inspector will flag. If you want the work to pass inspection the first time — and you don't want to be redoing drywall — hire a licensed electrician.
Planning a Kitchen Renovation in Chilliwack?
Get the electrical right — before the walls go up. We'll review your kitchen plans, quote the rough-in and trim-out, and coordinate directly with your contractor so your reno stays on schedule.